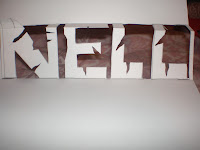
For this experiment, I made some pop up words and a few mechanisms.
This is a pop-up word. Creased letters on a square box.I used the name of my subject for my final piece. The crease would lie in the middle of the letters and they are formed by the front and the top of the box. As you can see, the letters have been torn at, to emphasise my subject's depression and suicidal thoughts.
At a better angle (at least now, you would be able to read the name). Although, it is quite difficult to read from the angle previously shown because of where the crease is.
INSTRUCTIONS:
- Type up or draw your chosen text, and draw a box around it using a pencil. Through the middle of letters, draw a green line. For the letter outline, use a blue pencil, and use a red line for across the paper.
- Using a scalpel, cut on the grey lines. But DO NOT cut around the letters yet. Score and mountain fold (fold inwards) the green lines, and score and valley fold (fold outwards) the red lines
- Pop the box out, by using your finger and push from the back. This creates the box.
- Cut around the letters in order to complete the pop-up word.
- Cut some parts out of the text, to give a spoiled and trampled effect.
This is the same pop-up word experiment, but the difference is that the crease lies towards the top of the letters instead of in the middle. By doing this, it makes the word easier to read. Again, the letters have been cut in some places for her suicidal feelings. (Instructions on how to make this, is the same, except for the green line going through the top of the letters instead of through the middle).
This is a V-Fold mechanism. In the middle is a heart attached to a V-fold, made with part of my circle flip book. When fully opened, the heart will "pop out" of the page of the flip book at a full 90 degrees.
This is what it looks like when it is slightly closed.
INSTRUCTIONS:
- Cut a strip of card, approximately 40mm wide. Also include tabs at the end of both sides of the strip.
- Mountain fold the strip of card, and valley fold the tabs.
- On the card base (the card you want to stick it on), paste it in the centre, making sure that the strip is flat.
- Glue your design on top of the mechanism, and leave for a few minutes. There is your standard v-fold.
This is an inverted V-fold. This is similar to the standard v-fold shown previously, except that the fold is folded in instead of out. I have to admit that this one was a bit challenging, because with my first attempt, I didn't quite get the folding right. I kept on folding the lines in the wrong direction, which would end up not becoming inverted but folding out- the OPPOSITE of what I wanted to achieve.
A side view of the inverted fold
Again, the heart was used, which was cut and torn in some places for my suicidal subject.
The mechanism when page of flip book is fully opened. I intend to use this mechanism in my final piece. But instead of using a heart, I may use a diary entry from my subject, which will fold out to reveal itself to the viewer.
INSTRUCTIONS:
- Get a square piece of paper and mark that paper with dotted diagonal lines and vertical dotted lines.
- Cut out the marked paper, and fold and unfold it in half vertically, and the diagonals too.
- Decide how wide your tab measurements should be, and cut off e.g.1/4 of the segments from the top and bottom.Cut the paper in half horizontally. This should leave you with 2 v-folds.
- Mountain fold (fold inwards) the diagonal lines, and Valley fold (fold outwards) the middle dotted line.
- Flatten the v-fold, and glue the tabs in the middle of the card you want to place it in.
- At this point, the inverted shape should be present in the middle of the fold, like a V shape. There is your V-fold.
These pop-up mechanism ideas and instructions are from Extreme Cards and Paper Crafting.


No comments:
Post a Comment