Thursday 29 March 2012

EXPERIMENTS FROM LINO PRINTS

I did a few Photoshop experiments using my lino prints.
This is a pixellated version of one of my lino prints. This involved filtering the image, and then clicking 'Pixellate' to give this effect. After that, I made a new file, and created the actual pixel, which was incorporated into the picture.
This is my lino with a vertical panel effect. I chose to make the size smaller with each panel. This involved making many layers and duplicating them to make each strip.
This is a selective colouring effect. This involved using the Lasso tool to single out what I wanted left coloured, and the rest to be black & white.
I used the first lino print again, and went to Dark Strokes under Brush Strokes, giving me this effect. I varied the intensity of the whites and blacks.

With the same picture, I duplicated them, using the same technique for the vertical panels.


Wednesday 28 March 2012

LINO PRINTING

                                                                              
As an experiment, I did some lino printing. In order to make a good lino print. I took the following steps:
Using tracing paper, I drew my design, which would be drawn on to the lino. Except, when I transfer the design on the lino sheet, I would draw it front to back, so that the design would come out the right way. Next, I would cut out the parts, I would want to be shown on the print, using a lino cutting tool and a bench hook to not cut into the tables. I made sure to change the blades, to very the marks I make, including the size of the marks. Although, I made not to cut too deep, or this would spoil the design. After this, I went on to make a lino printing, using oil-based inks and the Albion press. I then went on to use two colours on the sheet, creating a multi-coloured print.

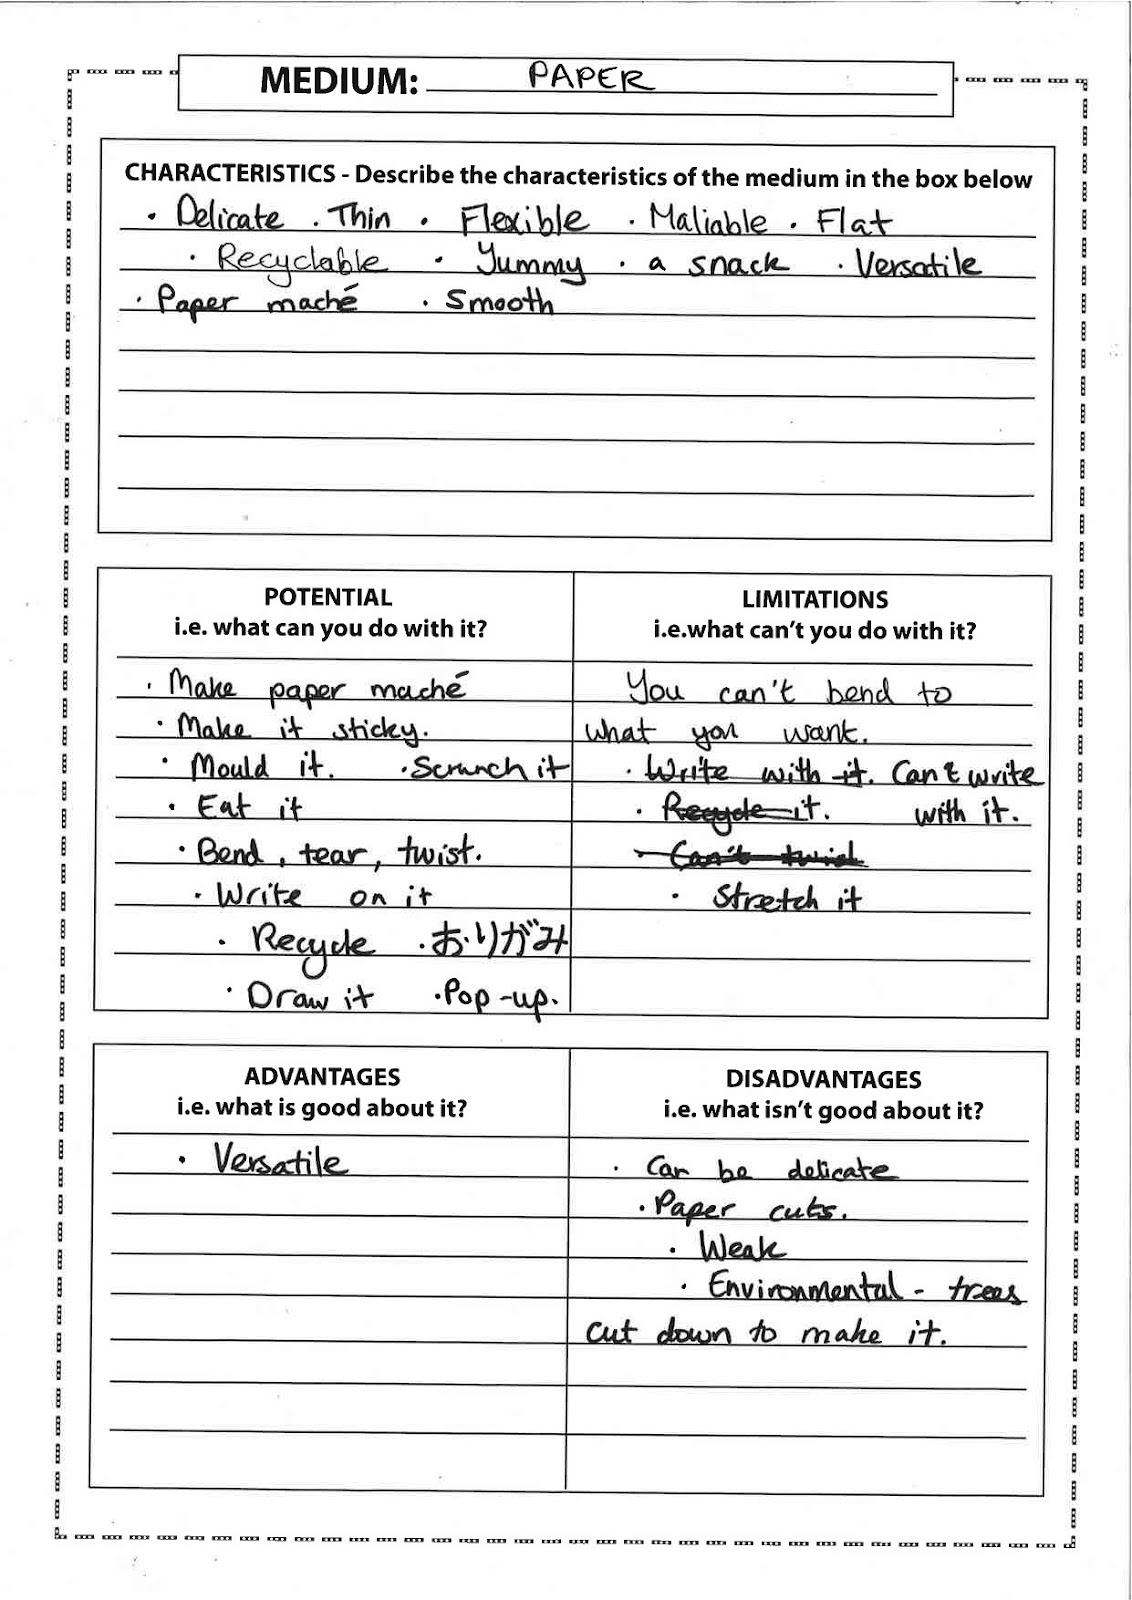
The characteristics of the lino sheet are that it's smooth, durable, bendy, tough, flat, hard, thin and reinforced. It's advantages are that you can carve it, print it, use for reduction printing, embossing, carve it, tough, sturdy, print on to multiple other surfaces, easy to use if you're an expert, easy for big or simple designs. However, its disadvantages are that the irreversible mistakes,  you can't print 3D objects, and it can be hard to carve into to texturise it. Also you can't go into detail with colours when printing, cleaning is a VERY long, long time to dry, and barrier cream has to be applied so that the oil-based ink can wash off of your skin. white spirit STINKS,  it is time consuming to cut,  it can be difficult to get used to, especially for beginners,  and it's also difficult to carve in detail.
This was my first lino print. It didn't go as well as I would have liked it, as I didn't apply enough ink on to it. However, the picture seems to show up, which is a good thing.
This was my second lino print. I used a blend of colours on the left hand side, and another different colour on the other. This print was much better than the last one, as enough ink was applied.
Third lino print. Not enough ink was applied this time around, but it was still sufficient enough.
This is the lino sheet, which was carved into, to make this picture, used to printing. As you can see, the picture is back to front from the prints, in order to make the prints come out the way I intended.


Saturday 17 March 2012

INITIAL IDEAS


This first idea was to create a box inspired by Lucas Samaras, similar to a briefcase, which has draws at the side of it, which would include trinkets and photographs of things that are attributed to the subject, which could be me or someone I know. It could even be of a random passer by and what I imagine their possessions to be. Me second idea was to have a brief case- like box which was inspired by Kim Welling†, containing hanging trinkets and quotes, as well as photos. On the front of the box, it would say a message 'Don't pull open' (but it obviously would be pulled open). Materials I would use would be cardboard, for the box itself, cartridge paper


The third idea was to create an funny-shaped box which again was inspired by Lucas Samaras, containing a drawn picture/photo on each side, which pop-up out of the box, with the help of a pop-up mechanisms. The pop-up mechanisms could be a standard one, a V-Fold mechanism. The pictures could be drawn using different media, such as paints, pencils, charcoal, oil pastel, or even drawing using one of these media, and manipulating it on Photoshop. That way, I'd be using more than one media.


The fourth idea was inspired by Hello Sandwich and Filip Peraic, was to create a sketchbook filled with inspiring quotes, pictures, trinkets and photos. One page would be a collage of pictures and photos, and the other would be of unfolding quotes, letters, post-it notes. Could also include trinkets.


My fifth idea would be inspired by Filip Peraic. It would involve a series of drawn self-portraits and text on certain experiences I have had from my storyboard memories. This would be accompanied by a dice, which the viewer would throw, and depending on that number, they would unfold the picture that many times.


Tuesday 13 March 2012

PAPER RELIEF, RUBBINGS AND EMBOSSING


                                           A rubbing taken from my relief made with oil pastel
A rubbing taken from my relief using charcoal on tracing paper.
Another rubbing from my relief using a crayon


This involved making a relief using card. I made a relief using my name in Japanese with some surrounding patterns. I used this relief to make some rubbings using charcoal, oil pastel and a crayon on tracing paper and cartridge paper.
                                                                                   
(If you look closely, you can see the embossing...)


Next, I used the relief again for embossing. This involved using damp paper, which was blotted, and laying the relief on top of the damp paper, and embossing it using an Albion Press.
I made two of these embossings, one of them I painted using watercolours.

Wednesday 7 March 2012

TRIP DRAWINGS AND PHOTOS


During the trip to the Hayward Gallery, I drew some studies of some of the pieces on display, as well as the surrounding area of the gallery. These included a model of an egg, for an Easter Egg hunt campaign, and of the people walking around. Another was off a neon typographic sculpture at the South Bank saying 'It's Freezing In Here' by David Shirgley, whose work we saw at the gallery.


PRIMARY RESEARCH VISIT

                                          
As a group, I went to the Hayward Gallery in London, to see the exhibitions of Jeremy Deller and David Shrigley.
The first exhibition was Jeremy Deller. He describes himself as 'self-taught conceptual artist', and is an assembler of things, and a stager of 'events'. He was born in 1966 and studied Art History at the Courtauld Institute, and later met Andy Warhol twenty years later. One of my favourite pieces of work was the bedroom installation. It's an original way of showing the viewer what the artist liked and revealed a bit of his personality. It also transports you back in to those times, as it was set to be in the 1980s. Another favourite of mine was the 'Valerie's Snack Bar', because that was quite original, and was also somewhat interactive.There would actually be waitresses serving free tea, and like the bedroom installation, it gives you an insight into Deller's fondness for 'England's homemade grassroots-level culture'.
David Shrigley was the second exhibition I saw. He was born in 1968 in Macclesfield, and trained as a fine artist. He is best known for his humorous drawings of observations on daily life. But his work also extends to sculpture and photography as well as weird animated films. One of my favourite pieces of work of his were from the 'Headlessness' section: The Headless squirrel. I liked it because it was just plain weird, but it lets the viewer make up their own story as to how the animal lost its head. The  dog, with a sign saying 'I'm dead', is also good, not just because it lets you figure out how the dog 'died' but also adds humour to a serious and sometimes scary subject-death. So it makes the topic of 'death' fairly light-hearted.

During our time in the exhibition, I had to complete some tasks such as writing real and fake places in Britain, writing a postcard and sending it to myself, and drawing the 'Bez masks' from one of the pieces of the exhibition, as well as creating posters to display around the college.

In general, I did like the exhibition because it was a "breath of fresh air" from the usual gallery of looking around at paintings, and  the works were interactive. I think this quality will even draw the attention of people who aren't all that interested in art. It also links in with the exam theme, as it includes different encounters and experiences of the artist and others, and might serve as inspiration to my final piece as well.


Tuesday 6 March 2012

POTENTIALS AND LIMITATIONS


For this, I had to experiment with what I could and couldn't do with paper. I used plenty of techniques such as bending, cutting and curling. As I was doing this, I was recording the advantages and disadvantages, characteristics and limitations, and potential. One of the advantages of paper was that it was versatile, it was used for many different purposes, such as drawing, writing (and sometimes eating). One of the disadvantages was that it tears quite easily, so that when you want to bend it, you may end up bending or twisting to an extent that it ends up tearing, rendering it useless.

Friday 2 March 2012

HORT ANALYSIS


This is a piece of Art Installation, created by an artist who goes by the name of Hort. When it was made is unknown, but it was made for a magazine article, in regards to living in a "happy city". The circumstances under what it was made was unknown, but may have been about the level of happiness of citizens living in particular cities.
The artist may have used cartridge paper, which is sturdy but easily torn, but using different colours such as plain white, yellow, green, pink and orange.These colours may have been used to symbolise the positivity in a city, to reveal the vibrant side of the city, helping the viewer see the good in it. The method could have been cutting of the paper to form buildings and sticking, using Pritt stick or PVA glue, but making sure no to glue down the picture completely, so it will be easier to remove part of the paper. To make the windows line up together nicely, the artist may have pre-defined the areas they wanted to cut before doing so, measuring them with a ruler, and cutting through, using a scalpel to make the cut outs nice and  even. The scale of the work is unknown, but a best guess would be around A4 size. The size of the piece may be irrelevant, because the message of the piece would be delivered just as quickly, because of the use of different colours. The use colours may have been used emotionally, to possibly put across the artist's positive attitude towards cities, and may be trying to persuade the viewers to adopt the same attitude about the cities they live in.
My first initial reaction to the work, was that it reminded me of the Wizard of Oz, when Dorothy steps into a world of colour from walking through a dull and grey place. And I think it has the potential to make the audience think more highly of their city. I like this piece, because it's and imaginative way of showing the positive aspects of  something without cluttering a page full of pictures showing this. And it's also original, as not many artists take up this concept and develop further to get this result. Furthermore, the method doesn't look too complicated, so it may interest others to make something similar to it.

SYDNEY OPERA HOUSE ART INSTALLATION.

                                      Staples stiletto tape dispensers
This piece is an art installation created by Darcy Prendergrast and his friends. Prendergast is an Australian artist, and started his career in his family home, and won the Junior Stanley award in 1999. When the piece was made is unknown, but was made to promote a competition arranged by the stationery shop, Staples.
Materials consisted of stationery, such as Post-it notes, paper clips, string, pens, markers. These were used, most likely because the artist was promoting a stationery shop, and use of the products they sell to create the installation would further emphasise this. The composition matches that of the Sydney Opera house and the area surrounding it, therefore it would need to be organised in such a way that is organised and resembles it closely. Also, the artist and helpers have used different colour objects, possibly to bring about a more positive side of life, or to make it more aesthetically pleasing, or to show a more colourful side of a possibly grey and dull city, which would encourage the audience to enter the competition. Also, it may provide some inspiration for the audience, showing them that their possibilities are endless.  Various paper manipulation techniques such as cutting, ripping and scoring may have been used to create the buildings and effects to make it the piece look more realistic, as well as stacking objects on top of the other in different arrangements, to show various types of designs for the surrounding buildings.
As mentioned before, the installation is a model of the Sydney Opera House. A landmark which is recognised internationally. This may invite people, even outside of Australia to join in on the competition.
I personally think that this piece is very crafty and creative, because Prendergast makes use resources that are people would least expect, and makes something, at a standard that people would least expect. It's also quite architectual, as it closely matches the appearance of the Opera house, and the added touches of the sky, the clouds and the ocean make it idyllic, as if the viewer is transported to Sydney.
Because of these reasons, I hold the piece in high regard. A lot of time and effort looks like it went into to it as well, and I consider it to be a huge achievement.

PAPER INSTALLATION


This involved creating models out of paper, which was inspired by the Sydney Opera House installation by Darcy Prendergast and friends. Since my exam brief is 'Self-portraits', I had to make some models to do with myself. I created a ball-ball like model, using a photo of me, which I cut into thin strips, and arrange them in order to re-make the photo. Another involved me tracing the photo, cutting that into strips as well as the photo, and sticking them next to each other, re-making the photo.